Using a Virtual Mobile Phone for Shared Multi-Factor Authentication
As an IT support organisation, we pride ourselves on staying up to date as much as possible with current trends and changing technologies, particularly in the Microsoft space. As such we keep a keen eye on technical blogs, whitepapers, LinkedIn articles, Twitter, Microsoft Office 365 notifications and of course we are part of the Microsoft Yammer community.
One such post piqued our interest recently on Yammer: https://www.yammer.com/office365partners/#/threads/show?threadId=1108664615
Hi there,
Was wondering if someone might be able to assist or even shed any light on what I would like to achieve.
We are a Microsoft Partner who manage multiple O365 Tenants for multiple clients. We would like to implement MFA on the Admin accounts but would like to have a central location where the MFA codes can be sent.
We could setup a Smart Phone with the Microsoft MFA App and add each client to this, but the issue we have here is the user would need to be in the same office as this device in order to get the code, which is not practical.
When MFA first came out you could have the MFA code sent to an email address, I see now that this feature has been removed.
Is there anyway to still have the MFA code go to email, through powershell perhaps?
One of the responses was this:
We have chosen to deal with this via a combo or Twilio, Logic Apps and Teams.
We pick up a mobile number from Twilio ($1 a month) per customer, use webhooks to call a Logic App in Azure, and then have the Logic app drop the code into a specific channel in Teams.
Not very complicated but provides reasonable protection (for now).
Now, the way that comment was written it seemed so easy right, so I thought we thought we’d have a look at what was involved. At the same time we had heard of Twilio but never needed to use it in anger. Plus, whilst I have been an end-user of text alerting it would be interesting to peek behind the curtain and see how that is all put together. Maybe one day soon we may have need for sending SMS alerts ourselves as part of updates, marketing, chatbots and so on.
Back to the task at hand.
When it comes to Global Admin privileges we very much advocate and adhere the following:
- Reseller relationship with our own individual admin accounts with MFA
- Individual admin accounts with MFA
- Shared admin account with MFA
We strongly urged the clients to have Cloud Only secondary administration accounts themselves. Best practice should be to always use a secondary administration account – even for On-Premises work. You should certainly NEVER use your own day to day account when administering servers and services. If your own machine, and by extension your own account was to become compromised then the hacker would gain administrative privileges and could very quickly cause carnage and mayhem within your organisation. Administrative accounts should be locked down for the purposes for only what they are intended. For example, we use dedicated Domain Admin accounts that can ONLY log on to Domain Controllers and nothing else.
Now, with Office 365 we likewise only have a dedicated Global Admin account that is unlicensed and only for the purpose of administering Office 365 and Azure. We also have non-Microsoft Accounts that also require MFA like Amazon, Apple, Google etc.
These accounts have a long complex password and that password in ONLY stored securely in LastPass) and additionally further secured by Multi-Factor Authentication.
We, like many other CSPs, support multiple clients therefore we have access across multiple tenants and for the reasons listed in Yammer not all administrative functions are available via Partner Centre:
Security & Compliance appears not accessible using the partner portal tenant entry. With increasingly more administrative tasks like mail flow insights and ATP moving to the Security & Compliance centre, a lack of access via the partner centre is quite frustrating
Quite often clients are deploying E5 licenses to make use of advanced security features, like conditional access, EMS, ATA etc. E5 licences are quite expensive. Additionally, having a Mailbox, Teams or SharePoint access attached to a Global Administration account may also be a requirement.
So having unlicensed administration accounts is not an option for them, but to the provide secondary licensed administration accounts to Global Admins is an unpalatable cost. Thus, a shared Admin account whilst certainly not desirable, is the trade-off between cost and supportability.
So, how can you make a shared administration account work for multiple users, but only one endpoint for MFA codes?
The short version:
Twilio and Azure
- We registered with Twilio and set-up a Mobile phone number
- We connected an Azure Logic App to retrieve the text message received in Twilio
- We set up an Action in the Logic App to post to our internal Teams Channel dedicated for MFA
** UPDATED 27 JULY 2018
Twilio VOIP numbers cannot accept SMS “shortcodes”. So, we cannot actually use the process explained in this blog for receiving MFA text alerts from Google or PayPal.
How to:
These are the steps we used.
- Register with Twilio and purchase a number: https://www.twilio.com
Go to their sign-up page here: https://www.twilio.com/try-twilio and fill out the usual details. You can opt for a trial, but we knew we were moving ahead with this, so we went right ahead and purchased the product. At $1 a month and 0.0075 cents a text we knew it would be a worthy investment. Go ahead and Sign up and verify your identity.

After this you will be promoted to give your first project a name – this is just a label, so choose something meaningful.

Now that you are set-up, you will arrive at your Home Page, the Console. This is where you can upgrade, look to the top right-hand corner and select upgrade.
Getting Started
Choose the red button option – “Start Sending Messages” this creates a Messaging Service. Give it a friendly name and choose standard.

Buy a number
Now you need to buy a number

Programmable SMS configure Inbound Settings
You will now be returned to the SMS console for Messaging Service – Programmable SMS.
Here you need to select Configure and go to Inbound Settings

Azure
- Now head over to Azure – https://portal.azure.com
Choose: Create a Resource
Search for Logic App


Be sure to pin it to the dashboard so you can find it later!!
Hit Create and it will open in Logic Apps Designer
Start
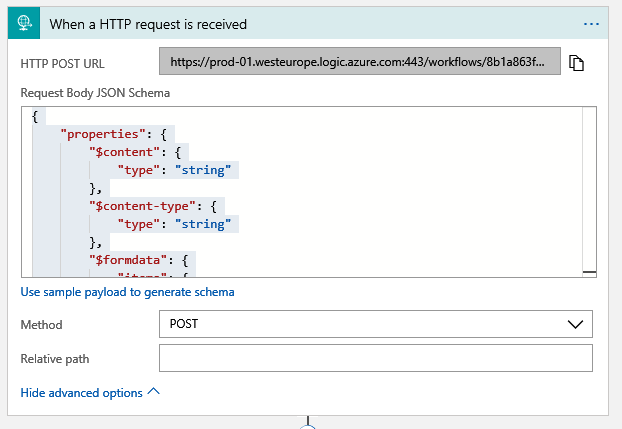
Start with a common trigger: When a HTTP request is received


Add this URL to your Twilio “Process inbound messages” settings from above.

Add Twilio Action
- Back to Azure, time to add a New step to our Logic App. This is where the Twilio integration happens. Select New Step and Add Action
Search for Twilio and then select Twilio – Get Message

Complete the following three fields: Connection Name, Twilio Name and Twilio Access Token. The Name you choose, the Name and Token you get from your Twilio profile
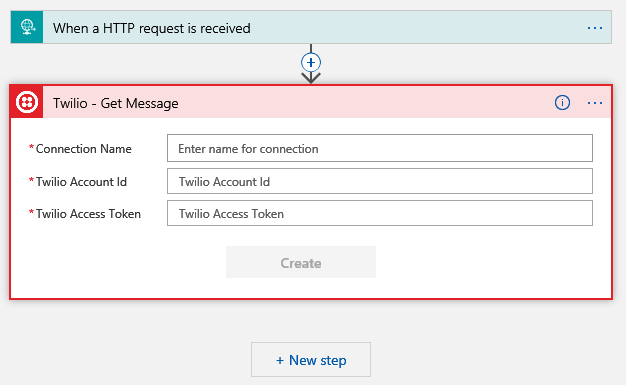
The Name is your ACCOUNT SID and your Access Token is your Auth Token. You get these by clicking on the Twilio logo in the top left-hand corner, then go to Settings. You will need to authenticate again to make changes.

In General Settings find the API Credentials

Add the relevant details and click create.
Add the JSON code
- Now comes the tricky part 😊 JSON code. I have not included how we figured out the correct JSON code to use ’cause that’s where the clever part was, but suffice to say what you need is below.
You need to go back to the HTTP step and edit. Paste this into the “Request Body JSON Schema”
{

"properties": {

"$content": {

"type": "string"

},

"$content-type": {

"type": "string"

},

"$formdata": {

"items": {

"properties": {

"key": {

"type": "string"

},

"value": {

"type": "string"

}

},

"required": [

"key",

"value"

],

"type": "object"

},

"type": "array"

}

},

"type": "object"

}
Now back to your Twilio Get Message action
For the Message SID field, this is a dynamic value for every text message, so this needs to be pulled out the HTTP response, per the code above. But it is buried, so you need to use a function to get it out.
Click Add dynamic content, chose expression and use triggerFormDataValue(‘MessageSid’)

Microsoft Teams
- New Step post your text message in to a Teams channel!
New Step, Add an action (search for Microsoft Teams) – At this stage you might want to have already created the Team and Channel you want to use for the notifications in the next step

Sign In

Complete the fields for Team Id, Channel Id and Message. Team Id and Channel Id are drop downs that are plainly obvious as your own Teams.
The Message field you should choose Add dynamic content (bottom right) and choose Message Text,. This is why the correct JSON code and expression from above were so important!!

Don’t forget to SAVE your Logic App in Azure.
Now you need to test it!
GOOD LUCK