Working with the on-premises AD Recycle Bin
Generally in day to day identity management you would not often need to resort to the Active Directory Recycle Bin, but when you do, typically it is a high priority request and you find yourself having to reacquaint yourself with the commands you need.
Accidental deletion scenarios
Where we have seen the need to restore users or groups or typically falls under these situations:
- A leaver that was deleted via the Joiner/Leaver process but has a change of circumstances and returns
- A connected DirSync system makes a deletion in its own directory that flows to the target AD that the Admin or Service was not aware of the impact it would cause
- In a connected source directory for DirSync, objects get inadvertently marked out of scope either by changing linked attributes or moving an OU within the OU structure
- An IT Admin running commands believing they were connected to Dev, Test or UAT – but were in fact connected to Production.
- A incorrectly written script with wrong commands or wrong scope
- A rogue/hostile Admin performing a malicious act
There are others of course.
In particular, I was not long ago across the second bullet point. An IBM Lotus Domino Directory was synchronising objects to Active Directory. An old Notes Admin trick is to cut and paste Person Documents or Mail-In Databases out of, and then, back into the Domino Directory. It’s usually a last resort option but often fixes the issue at hand.
Unfortunately the process of cutting out the document first, creates a deletion stub in the Domino Directory and this deletion flows down to Active Directory, and then also flows to Entra ID Connect (Azure AD Connect) which picks up that deletion and deletes the user from Microsoft 365 Entra ID.
It is the act of pasting back in the Notes document that triggers a NEW object and because the Quest (Binary Tree) DirSync tool does not re-animate objects from the AD Recycle Bin, a brand new object gets created and thus flows to Microsoft 365.
The users Mailbox, OneDrive, Group Memberships, Teams Access are all gone and the Mailbox and OneDrive that gets spun up new are vanilla fresh start and empty! Unpicking this becomes very painful, especially in retention environments.
Fortunately the DirSync tool we use, PowerSyncPro https://powersyncpro.com does re-animate objects from the AD Recycle Bin so we typically don’t run into this issue.
In another scenario, we have seen an upstream process where an Administrator has moved a whole OU that was in a selective DirSync scope and all the users were mass deleted in the downstream Active Directory (and flowed to Entra ID).
Plus of course the very frequent employee that left but has a change of heart and returns.
Enabling the AD Recycle Bin
Enabling the Active Directory Recycle Bin is generally recommended for most environments as it provides an added layer of protection against accidental deletions of Active Directory objects. So, if you have not yet, I would strongly urge you to enable the AD recycle bin. It is trivial to do, and will be a life saver if you ever need to call upon it.
Check for Recycle Bin enabled already
You can check if the Recycle Bin is already enabled by running this command at PowerShell Admin:
Get-ADOptionalFeature "Recycle Bin Feature"
You can enable it via PowerShell by using:
Enable-ADOptionalFeature -Identity 'Recycle Bin Feature' -Scope ForestOrConfigurationSet -Target [YourForestname.local]
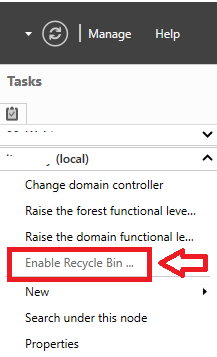
Via the UI you can use the Active Directory Administrative Center
Useful Commands
Get all objects in the Recycle Bin
Get-ADObject -ldapFilter:"(msDS-LastKnownRDN=*)" -IncludeDeletedObjects -Properties * | Select Name, DisplayName, IsDeleted, Deleted, samaccountname, userPrincipalName, whenChanged, modifyTimeStamp, Modified, DistinguishedName, ObjectGUID, ObjectClassA new attribute, msDS-LastKnownRDN, is populated with the object’s last known relative distinguished name (this attribute allows the Recycle Bin to properly reset an object’s RDN during its restoration, even if the object’s renaming resulted in the truncation of the original RDN).
Use these for specific objectClass you want to work with specifically
Get-ADObject -ldapFilter:"(msDS-LastKnownRDN=*)" -IncludeDeletedObjects | Where {$_.ObjectClass -eq 'User' }Get-ADObject -ldapFilter:"(msDS-LastKnownRDN=*)" -IncludeDeletedObjects | Where {$_.ObjectClass -eq 'Group' }Get-ADObject -ldapFilter:"(msDS-LastKnownRDN=*)" -IncludeDeletedObjects | Where {$_.ObjectClass -eq 'Contact' }Get-ADObject -ldapFilter:"(msDS-LastKnownRDN=*)" -IncludeDeletedObjects | Where {$_.ObjectClass -eq 'organizationalUnit' }
Get-ADObject -ldapFilter:"(msDS-LastKnownRDN=*)" -IncludeDeletedObjects | Where {$_.ObjectClass -eq "computer"}
Restore an AD Object from the Recyle Bin
Once you have identified the objects you want to work with and restore, then you can use Restore-ADObject
Use any attribute you want to work with e.g ObjectGUID, DistinguishedName
Get-ADObject -Filter {ObjectGUID -eq "f6a95a13-2554-432c-a20a-6e96c1304195"} -IncludeDeletedObjects | Restore-ADObjectGet-ADObject -ldapFilter:"(msDS-LastKnownRDN=*)" -IncludeDeletedObjects | Where {$_.DistinguishedName -eq "CN=John Doe\0ADEL:fcb580bd-6669-4160-8dd3-b6b11a2a9e10,CN=Deleted Objects,DC=contoso,DC=local"} | Restore-ADObject
Restore multiple objects from a date range
Useful if you know bulk deletions happened on a specifc date and time
$startDate = Get-Date "2024-02-19"$endDate = Get-Date "2024-02-20"
# CHECK
Get-ADObject -Filter {objectClass -eq "user" -and isDeleted -eq $true -and whenChanged -ge $startDate -and whenChanged -le $endDate} -IncludeDeletedObjects -Property whenChanged | Select Name, DisplayName, IsDeleted, samaccountname, userPrincipalName, Deleted, whenChanged, modifyTimeStamp, Modified, DistinguishedName,ObjectGUID,ObjectClass

# Restore
Get-ADObject -Filter {objectClass -eq "user" -and isDeleted -eq $true -and whenChanged -ge $startDate -and whenChanged -le $endDate} -IncludeDeletedObjects | Restore-ADObject
Hard Delete a single object
Get-ADObject -Filter {ObjectGUID -eq "466d1772-c34c-4b73-ab99-d53959587a0e"} -IncludeDeletedObjects | Remove-ADObject -Confirm:$FalseHard Delete multiple objects
Get-ADObject -ldapFilter:"(msDS-LastKnownRDN=*)" -IncludeDeletedObjects | Where {$_.ObjectClass -eq "computer"} | Remove-ADObject -Confirm:$falseGo nuclear and empty the AD Recycle Bin
Not recommended of course in any production environment, unless you truly know what you are doing and why, but if for whatever reason you must hard delete everything in the AD Recycle Bin then you can use:
Get-ADObject -Filter 'isDeleted -eq $true -and Name -like "*DEL:*"' -IncludeDeletedObjects | Remove-ADObject -Confirm:$false